Millions of website owners utilize the popular CMS ( content management system ) WordPress. The logo is one of a website’s most important components of any website. A professional logo helps in brand recognition and improves the professionalism of your website. Sometimes, it can be difficult to adjust your logo’s size on your WordPress website, especially if you are unfamiliar with WordPress. This guide is totally about how to change logo size in WordPress.
Understanding Logo Sizes in WordPress
Before we go into how to change the size of your logo in WordPress, it’s necessary to understand the different logo sizes. WordPress places logos of various sizes around your page. The header, footer, and sidebar are examples of these areas. The following are the most common logo sizes used in WordPress:
- Header Logo: Your website’s header logo is the most crucial logo. This logo is usually displayed towards the top of your page and is the first thing visitors notice. The size of the header logo is determined by the theme of your website.
- Footer Logo: The footer logo appears at the bottom of your website. The size of the footer logo is also determined by the theme of your website.
- The sidebar logo is normally shown on the left side of your page. The size of your sidebar logo is determined by the width of your website’s sidebar.
Method 1: Change Logo Size in WordPress Theme Customization
Before we begin, keep in mind that not all WordPress themes allow you to change the size of your logo. So, first, check to see if your current theme supports this feature.
1) Examine the Logo Customization Option
2) Access your WordPress Dashboard.
3) Select Appearance > Theme Customization.
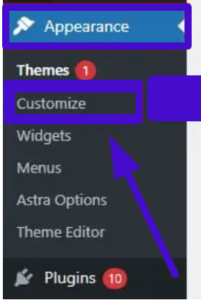
3) Look for the option Site Identity.
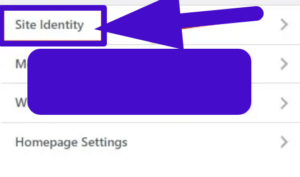
4) If you are unable to locate Site Identity, look for another option named Header Builder.
Please keep in mind that I’m using the Astra theme, which has the Site Identity option.
5) When you’ve found Site Identity, click on it.
6) The Site Title & Logo Settings should now be visible.
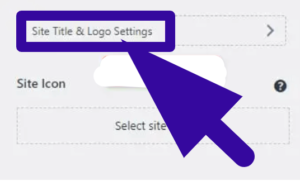
Click on the Site Title and Logo.
You’ll see several logo widths and size options on the screen.
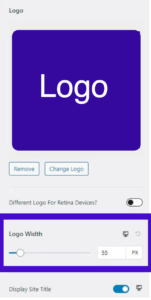
Change the width or size of your logo as needed.
Method 2: Using CSS to Change the Size of a Logo
One of the simplest ways to adjust the size of your logo in WordPress is to utilize CSS. CSS, which stands for Cascading Style Sheets, is a style language used to specify the display of an HTML text. Here’s how to use CSS to modify the size of your logo:
Access your WordPress dashboard.
Select Appearance > Customise.
Select Additional CSS.
Insert the following code:
.logo img {
  max-width: 100%;
  height: auto;
}
Press the Publish button.
This code makes your logo responsive and adjusts its size dependent on the screen size of the device used to view your website.
Method 3: Using a Plugin to Change Logo Size
If you’re not experienced with CSS or the WordPress Customizer, you may modify the size of your logo with a plugin. There are several plugins in the WordPress library that may assist you with this operation. Here’s how to use a plugin to modify the size of your logo:
Access your WordPress dashboard.
Select Plugins > Add New.
Find a logo resizing plugin.
Install and enable the plugin.
To resize your logo, follow the instructions provided by the plugin.
Save the file.
Method 4: Changing Logo Size with PHP
The final option for adjusting the size of your WordPress logo is to utilize PHP. PHP is a programming language used on the server to build dynamic web pages. Here’s how to use PHP to modify the size of your logo:
Access your WordPress dashboard.
Navigate to Appearance > Theme Editor.
Select functions.php.
At the end of the functions.php file, add the following code:
add_filter( 'get_custom_logo', 'change_logo_class' );
function change_logo_class( $html ) {
    $html = str_replace( 'custom-logo', 'custom-logo resized-logo', $html );
    return $html;
}
Save your changes.
This code will add a special class to your logo, allowing you to CSS target it and alter its size. The width and height of the logo may then be adjusted using CSS.
Changing the size of your logo in WordPress is a simple process with four options. You can quickly alter the size of your logo and make it appear amazing on your website by using CSS, the WordPress Customizer, a plugin, or PHP.
Final Thoughts
We’ve taught you how to modify the size of your logo in WordPress using four simple techniques in this post. You can quickly alter the size of your logo and make it appear amazing on your website whether you’re familiar with CSS, the WordPress Customizer, a plugin, or PHP. Remember that your logo is a key aspect of your brand, so getting it correctly is critical. You’ll be able to resize your logo and make your website appear more professional in no time with these strategies.