How to Fix The Critical Error in WordPress

How to Fix The Critical Error in WordPress

When your WordPress site suddenly stops working and shows a message like “There has been a critical error on this website,” it can be really scary. You might feel locked out, unable to access the front end, and worried about losing visitors who see the error. If you’re experiencing this critical error on your WordPress site, don’t panic. This guide will show you how to fix the critical error in WordPress, including what causes it and how to prevent it from happening again.

Fortunately, fixing this error is often simple. It usually involves adding a small PHP function or removing a problematic plugin. We’ll explore different troubleshooting methods to help you get your site back online quickly.

Understanding the Critical Error in WordPress

The critical error in WordPress is a problem that prevents WordPress from loading all the necessary scripts, causing issues with how the site functions. In the past, this error would often result in a white screen of death or a fatal error message, which could be confusing and difficult for beginners to fix.

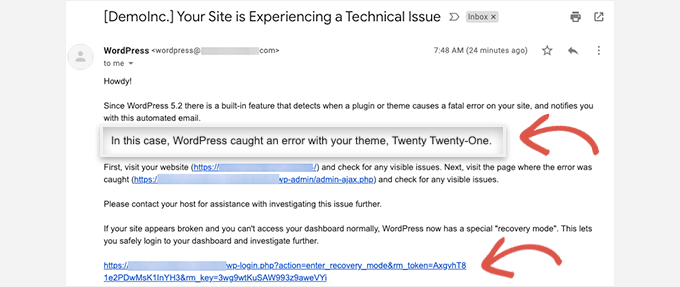
However, since WordPress 5.2, users now see a more informative error message: ‘There has been a critical error on this website. Please check your site admin email inbox for instructions,‘ along with a link to the WordPress debugging guide.How to Fix The Critical Error in WordPress

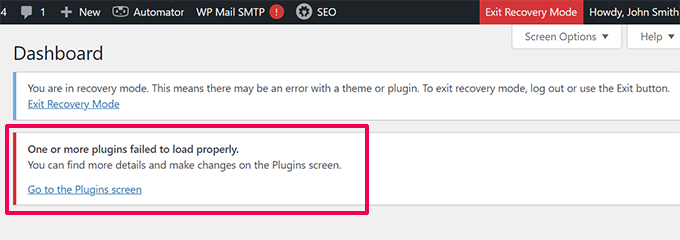
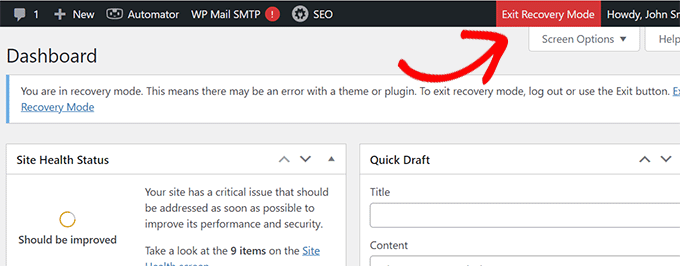
When this error occurs, WordPress also sends an email to the site’s admin email address. This email contains more details about the plugin or theme causing the error and a link to access the WordPress dashboard in recovery mode.

In some cases, the error message may only indicate that your website is experiencing a critical error, without providing instructions to check your email. This can happen if WordPress fails to load the necessary files for recovery mode or to send the email.

What Causes the “There Has Been a Critical Error on Your Website” Error in WordPress?

While this error message is less alarming than a completely blank screen, it can still be confusing. You might be wondering, what causes this critical error? Similar to the White Screen of Death, the critical error is often related to PHP issues. It could be due to exceeding your memory limit, errors in your code, plugins, theme, or even database corruption.

Understanding these potential causes can make troubleshooting much easier. Additionally, you might encounter other WordPress errors alongside the critical error. Some common ones include:

  • ERR_CONNECTION_TIMED_OUT: Caused by a slow or overloaded web server.
  • ERR_CACHE_MISS: Indicates issues with your website’s cache or PHP tools like plugins.
  • 500 Internal Server Error: A serious error usually linked to server file corruption.
  • Error Establishing a Database Connection: Often caused by database corruption or server issues.
  • HTTP 503 Service Unavailable: Indicates a problem with your server.
  • HTTP 502 Bad Gateway: Another server issue, often caused by too many visitors overloading it.

How to Fix the Critical Error in WordPress

The critical error message in WordPress isn’t always straightforward in pinpointing the issue. However, WordPress also sends an email to your admin email address with more details.

Many WordPress sites don’t send emails using SMTP, so you might not receive the email despite WordPress saying it sent one. Some sites may only see the critical error message without instructions to check the email because WordPress couldn’t load the files needed for email or recovery mode.How to Fix The Critical Error in WordPress

Please Note: If you didn’t receive the email, don’t worry. We’ll show you how to fix the critical error without it. If you did receive the email, we’ll help you understand it and use it to resolve the issue.

Fixing the Critical Error With WordPress Debugging Email

Start by checking the inbox for your website’s WordPress administration email address. If you’re not sure which email address you used as the admin email, it’s the one you provided during WordPress installation.

You’ll find an email in your inbox with the subject line ‘Your Site is Experiencing a Technical Issue.’ Inside, you’ll find helpful information about what caused the critical error on your WordPress website.

For example, the email might indicate that the critical error was caused by a WordPress theme. The email also includes a unique link that lets you log in to your WordPress website in recovery mode to investigate and fix the issue.

At the bottom of the email, you’ll find more detailed information about the error, including the specific file and code that triggered it. Once logged in, you’ll see a notification about the critical error, what caused it, and a link to where you can fix it. How to Fix The Critical Error in WordPress

For instance, if the error was caused by a plugin, you can deactivate the plugin and look for an alternative or seek support from the plugin developers. How to Fix The Critical Error in WordPress

If the issue lies with your theme, you can change your WordPress theme or reinstall a fresh copy from the official source. Once you’ve addressed the issue, click ‘Exit Recovery Mode‘ to return your website to normal. How to Fix The Critical Error in WordPress

Fixing a Critical Error in WordPress Without Email

If you didn’t get an email about the critical error in WordPress, you can still fix it manually. There are different methods to help you find and solve the problem, even if you’re not sure what caused it.

Deactivating All Plugins:

  1. Access Your Website’s Files: Use an FTP client or File Manager app in your hosting control panel to connect to your website’s files.
  2. Navigate to the wp-content Folder: Once connected, find the ‘wp-content‘ folder in your website’s root directory.
  3. Rename the Plugins Folder: Inside the ‘wp-content’ folder, locate the ‘plugins‘ folder. Right-click on it and choose the ‘Rename‘ option. You can name it anything you like, such as ‘plugins deactivated‘. How to Fix The Critical Error in WordPress
  4. Check Your Website: Visit your website to see if the critical error is resolved. Renaming the ‘plugins‘ folder deactivates all plugins, so if the error disappears, you’ll know it was caused by a plugin.
  5. Reactivate Plugins (Optional): If the critical error is gone, you can reactivate your plugins one by one. Rename the ‘plugins deactivated‘ folder back to ‘plugins’, and then activate each plugin in your WordPress admin dashboard. This way, you can identify which plugin was causing the issue.

By following these steps, you can deactivate all plugins in WordPress to troubleshoot and fix a critical error on your website.

Switching to a Default Theme in WordPress

Switching to a default theme can help resolve a critical error in WordPress if the issue is caused by your current theme. Here’s how you can do it:

  1. Download a Default Theme: Visit the WordPress.org theme directory and download a default theme like Twenty Twenty-Two or Twenty Twenty-Three. How to Fix The Critical Error in WordPress
  2. Unzip the Theme File: Extract the theme files from the downloaded zip folder on your computer. You’ll see a folder with the theme’s name. How to Fix The Critical Error in WordPress
  3. Access Your Website’s Files: Connect to your WordPress site using an FTP client or File Manager app in your hosting control panel.
  4. Navigate to the Themes Folder: In your website’s files, go to the ‘/wp-content/themes’ directory. This is where all your installed themes are stored.
  5. Backup Existing Themes: Before deleting any themes, it’s a good idea to download them to your computer as a backup. Right-click on each theme folder and select ‘Download‘. How to Fix The Critical Error in WordPress
  6. Delete Current Theme: Delete all the theme folders in the ‘/wp-content/themes’ directory. This will temporarily remove the current theme from your site.
  7. Upload the Default Theme: Upload the default theme folder you downloaded earlier to the ‘/wp-content/themes’ directory.
  8. How to Fix The Critical Error in WordPressCheck Your Website: Visit your website to see if the critical error is resolved. If switching to the default theme fixed the issue, you should be able to access your website without seeing the error message.
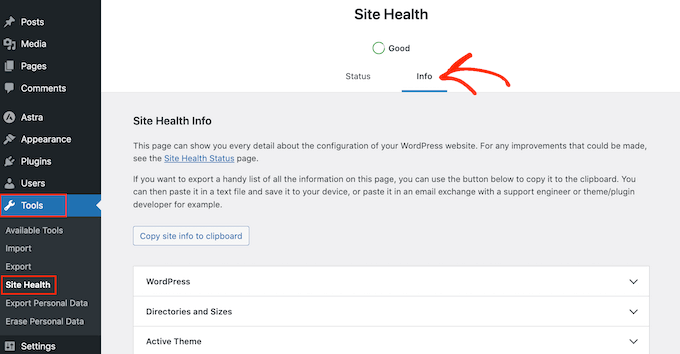
By following these steps, you can switch to a default theme in WordPress to troubleshoot and fix a critical error on your website

Enabling Debugging in WordPress

Debugging is a helpful tool for troubleshooting issues on your WordPress site. Here’s how you can enable debugging and access the debug log:

  • Connect to Your Site with FTP: Use an FTP client to connect to your website’s files.
  • Locate the wp-config.php File: In the root folder of your WordPress installation, find the ‘wp-config.php’ file.
  • Edit the wp-config.php File: Open the ‘wp-config.php’ file using a text editor or IDE.
  • Add Debugging Code: Insert the following code just before the line that says ‘/* That’s all, stop editing! Happy blogging. */’:
define( 'WP_DEBUG', true );
define( 'WP_DEBUG_DISPLAY', false );
define( 'WP_DEBUG_LOG', true );

  • Save and Close the File: Save the changes you made to the ‘wp-config.php’ file and close the text editor or IDE.
  • Check the Debug Log: You can find the debug log in the ‘wp-content’ folder of your WordPress installation. Look for a file named ‘debug.log’. Open this file to view the PHP errors occurring on your site.
  • Troubleshoot the Issues: Look for references to themes or plugins that may be causing the problem. This information can help you identify and resolve the issue.
  • Disable Debugging: Once you’ve finished troubleshooting, remember to remove the debugging code from the ‘wp-config.php’ file to disable debugging. This ensures that PHP errors are no longer logged.

Enabling debugging can provide valuable insights into the issues affecting your WordPress site. However, it’s important to disable debugging once you’ve resolved the issue, as it can expose sensitive information and impact the performance of your site.

Increasing PHP Memory Limit in WordPress

Your hosting server needs enough memory to run PHP and other applications smoothly. If it lacks memory, it can cause PHP to crash, leading to a critical error in WordPress.

To resolve this, you can increase the PHP memory limit by adding a line to your wp-config.php file. Here’s how:

  1. Access Your WordPress Files: Use an FTP client or File Manager in your hosting control panel to access your website’s files.
  2. Edit the wp-config.php File: Locate the ‘wp-config.php’ file in the root directory of your WordPress installation. Open it in a text editor.
  3. Add the PHP Memory Limit Line: Add the following line just before the line that says ‘/* That’s all, stop editing! Happy blogging. */’:
    define( 'WP_MEMORY_LIMIT', '512M' );

    This line sets the PHP memory limit to 512 megabytes. You can adjust the value (e.g., ‘256M’, ‘1024M’) based on your needs.

  4. Save and Upload the File: Save the changes to the ‘wp-config.php’ file and upload it back to your server.
  5. Verify the PHP Memory Limit: You can check if the PHP memory limit has been increased by installing and activating the WP Memory Usage plugin. This plugin will show you the current PHP memory limit in the WordPress admin area.

Increasing the PHP memory limit can help prevent critical errors in WordPress by ensuring that your server has enough resources to run PHP and other processes effectively.

Upgrading Your PHP Version in WordPress

WordPress requires PHP version 7.4 or higher to function properly. If your hosting server is running an older PHP version, it could lead to compatibility issues and possibly cause critical errors in WordPress.

Here’s how you can check and upgrade your PHP version:

  1. Check Your Current PHP Version: You can check the PHP version your site is using by going to the WordPress admin area. Navigate to Tools » Site Health and then click on the Info tab. Look for the PHP version under the Server section. How to Fix The Critical Error in WordPress
  2. Upgrade Your PHP Version: If your PHP version is lower than 7.4, you’ll need to upgrade it. Most reputable hosting companies make it easy to upgrade PHP from the hosting account control panel. How to Fix The Critical Error in WordPress
  3. Access Your Hosting Control Panel: Log in to your hosting account and navigate to the control panel. The exact steps may vary depending on your hosting provider.
  4. Locate the PHP Settings: Look for the PHP settings or PHP configuration section in your hosting control panel.
  5. Select the Desired PHP Version: In the PHP settings, you should see an option to change the PHP version. Select PHP 7.4 or higher from the available options.
  6. Apply the Changes: Save your changes to apply the new PHP version to your website.
  7. Check Your Website: After upgrading PHP, visit your website to ensure that it’s working correctly. Check for any PHP-related errors or issues.

Upgrading your PHP version can improve the performance and security of your WordPress site. It’s recommended to always use the latest stable version of PHP supported by WordPress.

Reinstalling WordPress

If you suspect that a corrupt WordPress core file or malware is causing the critical error on your site, reinstalling WordPress can help resolve the issue. Here’s how you can do it:

  1. Download a Fresh Copy of WordPress: Go to WordPress.org and download the latest version of WordPress to your computer.
  2. Unzip the WordPress Files: After downloading the file, unzip it to your computer. This will create a folder named ‘WordPress’ containing all the necessary files for reinstallation.How to Fix The Critical Error in WordPress
  3. Connect to Your Website: Use an FTP client or the File Manager app in your hosting account’s dashboard to connect to your website.
  4. Navigate to the Root Folder: In your website’s root folder (where you can find the wp-admin, wp-content, and wp-includes folders), select all the files inside the ‘WordPress’ folder on your computer.
  5. Upload the WordPress Files: Upload these files to your website. When prompted, choose to overwrite the existing files. How to Fix The Critical Error in WordPress
  6. Replace Core Files: Your FTP client will replace the core WordPress files on your site with the fresh copies from your computer. This process may take some time, depending on the number of files being replaced.How to Fix The Critical Error in WordPress
  7. Verify the Reinstallation: Once the upload is complete, visit your website to check if the critical error has been resolved. If the error was caused by a corrupt core file or malware, it should now be fixed.

Reinstalling WordPress replaces the core files of your site with fresh copies, which can help resolve critical errors caused by corruption or malware.

Additional Reading:
How to use FTP to upload files to WordPress

What is an FTP Client?

 FAQs

Is it safe to delete the cache in the directory of wp-content/cache/autoptimize?

Yes, it is safe but make sure to clear any page cache you might have.

What does critical error on WordPress mean?

Some WordPress errors may block you from accessing the dashboard, displaying the message, “There has been a critical error on this website. Please check your site admin email inbox for instructions.” This message means that there’s a fatal PHP error on the site.

Should I install WordPress manually?

If you are using a hosting provider, you may already have a WordPress database set up for you, or there may be an automated setup solution to do so. Check your hosting provider’s support pages or your control panel for clues about whether or not you’ll need to create one manually.