Understanding Z-Index is crucial for anyone working with web design, especially when using powerful tools like Elementor. Z-Index determines the layering of elements on a webpage, allowing you to create dynamic and visually appealing designs. In this article, we’ll dive into the concept of Z-Index, its importance in Elementor, and how to use Z-index in Elementor effectively.
A Little About Z-index
Z-Index is a CSS property that controls the vertical stacking order of elements on a webpage. Elements with a higher Z-Index value appear in front of those with a lower value. This property is essential for creating layered effects and managing the visibility of overlapping elements.
How Z-Index Affects Layering in Web Design
In web design, elements are often layered on top of each other. Z-Index helps you control which elements should be visible in front of others, enabling complex designs and interactions. Understanding how to manipulate Z-Index is key to mastering web design.
How to Use Z-Index in Elementor?
When you’re designing your webpage, you’re like an artist arranging things on a canvas. With Z-Index, you can decide which things come closer to you (the front) and which stay farther away (the back). This gives your website a 3D look, like a cool pop-up book.
Understanding the Basics of CSS Positioning
Static, Relative, Absolute, and Fixed Positioning
- Static: The default position; elements follow the document’s normal flow.
- Relative: Positioned relative to its normal position.
- Absolute: Positioned relative to the nearest positioned ancestor.
- Fixed: Positioned relative to the viewport, remaining fixed during scrolling.
How Positioning Interacts with Z-Index
For Z-Index to work, the element must have a position value other than static. Understanding how positioning works is crucial for effectively using Z-Index.
How to Use Z-Index in Elementor
Imagine you’re making a webpage about your favorite animal, the awesome panda. You have a picture of a panda and some text to describe it. You want the text to show up right on top of the picture to make it look cool.
Here’s how you do it using Z-Index in Elementor:
- Bring in the Elements: First, add the “Image” of the panda and the “Text Editor” for your description of your page.
- Lifting the Text:
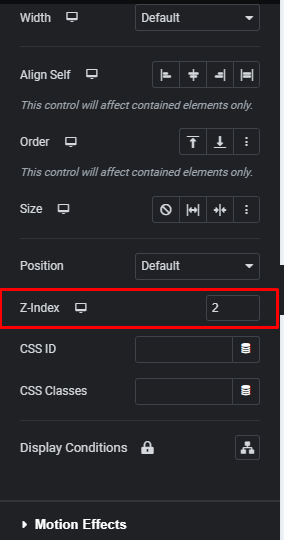
- Click on the “Text Editor” and find the “Advanced” settings in Elementor.
- Change the Position to Absolute or Fixed
- Look for the “Z-Index” option – this is where the magic happens.

- Increase the Z-Index number (try 2) for the “Text Editor.”
- See the Magic: Preview your webpage, and you’ll notice the text magically appears on top of the panda picture. It’s like the text is floating right above the picture!


Why Z-Index Matters:
Z-Index is like a secret tool that helps you control what people see first on your webpage. It’s like deciding which part of your story to show off. When you want something to be more important, you give it a higher Z-index number, and it jumps to the front of the line.
Practical Examples of Z-Index Adjustments
| Scenario | Description |
|---|---|
| Headers Overlapping Content | Increase the Z-index of the header to ensure it stays on top. |
| Popups | Set a high Z-Index for popups to ensure they appear above all other content. |
Common Scenarios for Using Z-Index in Elementor
| Scenario | Description |
|---|---|
| Overlapping Sections and Columns | When sections or columns overlap, adjusting the Z-Index ensures the correct element remains visible. |
| Creating Layered Effects | Use Z-Index to layer images behind or in front of text, creating visually engaging designs. |
| Handling Popups and Overlays | Ensure popups and overlays have a high Z-Index to appear above the main content, enhancing user interaction. |
Advanced Techniques with Z-Index
| Technique | Description |
|---|---|
| Managing Complex Layering Scenarios | In complex designs, carefully manage Z-Index values to avoid conflicts. Keep track of Z-Index values used across elements. |
| Combining Z-Index with Custom CSS in Elementor | For advanced control, you can use custom CSS in Elementor. This allows for more precise Z-Index management and integration with other CSS properties. |
Troubleshooting Common Update Issues
| Problem | Solution |
|---|---|
| White Screen of Death | Clear your cache and check for plugin/theme conflicts. |
| Update Failed | Restore from backup and try again. |
| Compatibility Issues | Roll back to the previous version and consult with the developer. |
Rollback to a Previous Version if Needed
| Method | Description |
|---|---|
| Use a Plugin | Install a plugin like WP Rollback to revert to a previous version of a plugin or theme. |
| Manual Rollback | Restore your site from a backup. |
Troubleshooting Z-Index Issues
| Problem | Description |
|---|---|
| Element Not Visible | Ensure the element has a position value other than static. |
| Overlapping Issues | Check for conflicting Z-Index values across elements. |
| Solution | Description |
|---|---|
| Adjust Z-Index Values | Modify the Z-Index values to resolve conflicts. |
| Use Relative Positioning | Ensure elements have relative positioning for Z-Index to take effect. |
| Debugging Technique | Description |
|---|---|
| Inspect Element Tool | Use browser developer tools to inspect elements and their Z-Index values. |
| Testing Changes | Test changes on a staging site before applying them to the live site. |
Best Practices for Using Z-Index in Elementor
| Practice | Description |
|---|---|
| Keeping Your Design Organized | Maintain a consistent approach to setting Z-Index values to avoid confusion and conflicts. |
| Maintaining Readability and Accessibility | Ensure that changes to Z-Index do not negatively impact the readability or accessibility of your site. |
| Tips for Effective Layer Management | Use incremental values and document your Z-Index values for easy reference. |
In a Nutshell
So, there you have it! Z-Index is like arranging things on your webpage so that some things come closer to you, giving your design a cool 3D feel. It’s your ticket to making elements on your website pop out and get noticed. Just remember, a higher Z-Index means closer to you, and that’s the secret to making your website design super awesome!
It transforms static design into an unfolding narrative, inviting users to traverse through layers of experience. Through the deft orchestration of Z-Index, you wield the power to craft immersive, visually engaging worlds that captivate, resonate, and linger in the hearts and minds of your audience. Embrace the mystique of Z-Index, and embark on a journey of design transcendence in the boundless realm of Elementor.
Additional Reading:
How to Fix the Critical Error in WordPress
How to Add an FTP Like File Manager in WordPress
FAQs
Q1: What exactly is Z-Index in Elementor?
Z-Index is like a special tool in Elementor that helps you decide the order in which different elements on your webpage are stacked. It’s all about making some things look like they’re in front and others seem like they’re behind.
Q2: Why is Z-Index important for my website design?
Z-Index adds a sense of depth and dimension to your webpage. It lets you control which parts of your design are more prominent and catch people’s attention.
Q3: How do I change the Z-index of an element in Elementor?
It’s quite simple! Just select the element you want to work with, go to the “Advanced” settings, and look for the “Z-Index” option. You can increase or decrease the Z-Index value to change the stacking order.
Q4: Can I use Z-Index to make text appear on top of an image in Elementor?
Absolutely! Z-Index is great for creating effects like putting text on top of an image. By giving the text a higher Z-index value than the image, the text will appear in front of the image.
Q5: What happens if I give all my elements the same Z-Index value?
If you give all elements the same Z-Index value, they’ll be stacked based on their order in the HTML code. The last element will appear on top. It’s like a line of friends – the one at the end is usually the most visible.
Q6: Are there any things I should be careful about when using Z-Index?
Yes, while Z-Index is a powerful tool, using it excessively or without thought can make your design confusing. Always make sure to preview your design to ensure that elements appear as intended and don’t overlap in a messy way.
Q7: Can I use Z-Index for more complex designs, like menus and popups?
Absolutely! Z-Index is versatile. You can use it to create dropdown menus that appear above other content or to make popup messages stand out. Just remember that higher values bring elements to the front.
Q8: Does Z-Index work the same way on all devices and browsers?
Yes, Z-Index works across different devices and browsers, but it’s always a good practice to test your design on various devices to ensure everything looks as expected.
Q9: Is Z-Index the only way to control element stacking in Elementor?
While Z-Index is a commonly used method, Elementor also uses other techniques like Flexbox and Grid to control layout and stacking. However, Z-Index is specifically focused on the order of elements in the vertical space.
Q10: How can I use Z-Index to make my website design more engaging?
Experiment! Try giving important elements, like call-to-action buttons or headings, a higher Z-index to make them stand out. Just remember, Z-Index is like arranging a visual hierarchy – use it to guide your visitors’ attention and create a visually appealing experience.
Q11: Where can I learn more about Z-Index and Elementor?
You can find more information about Z-Index and Elementor in their official documentation, online tutorials, and design forums. Don’t hesitate to explore and learn as you go!