Your WordPress site’s title is often the first thing visitors see, making it a critical element for your online brand. Whether you’re rebranding, updating information, or want a fresh look, this article will guide you on how to Change Site Title in WordPress through five different methods.
How to Change Site Title in WordPress
WordPress makes changing your site title a straightforward process, and there are multiple ways to do it. In this article, we’ll explore various methods to help you make your site’s title suit your needs.
Method 1: Changing Site Title in WordPress Settings
One of the most straightforward methods is through the WordPress Settings. To do this,
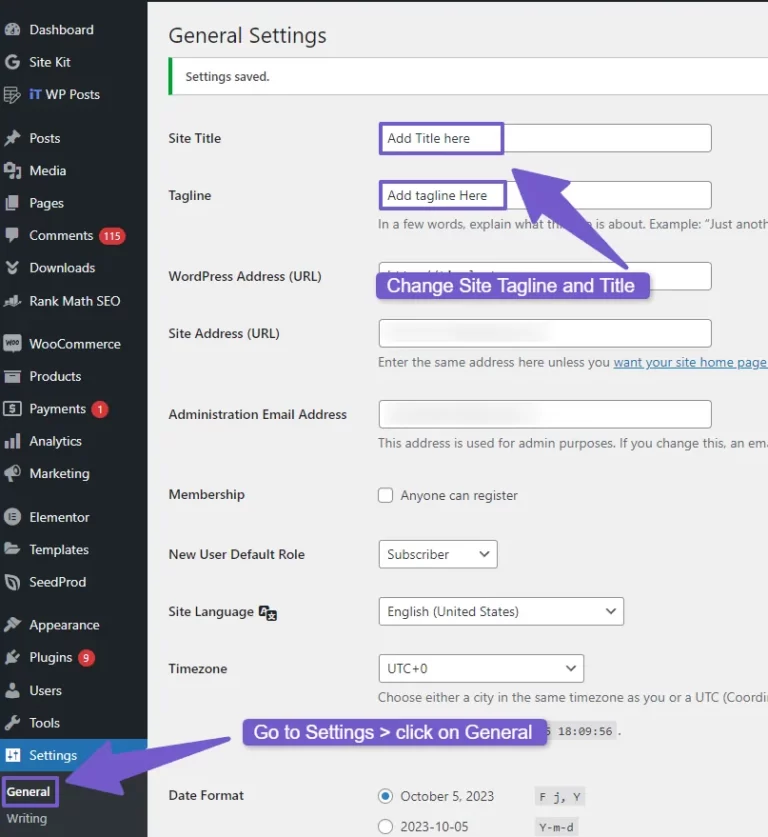
- access your WordPress dashboard and navigate to “Settings” in the left menu.
- Click on “General” and locate the “Site Title” field.

- You can edit or replace the existing title, ensuring it aligns with your site’s purpose.
- Don’t forget to click “Save Changes” to apply your new title.
Method 2: Changing Site Title in WordPress Customizer
Customizing your site title is another simple way to make changes.
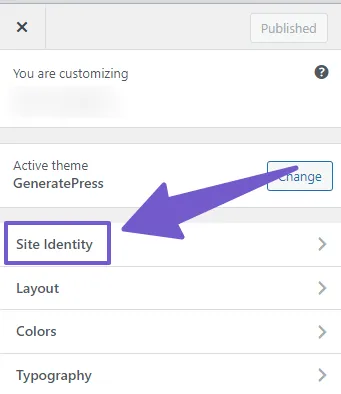
- Access your WordPress dashboard and go to “Appearance,” then click “Customize.”

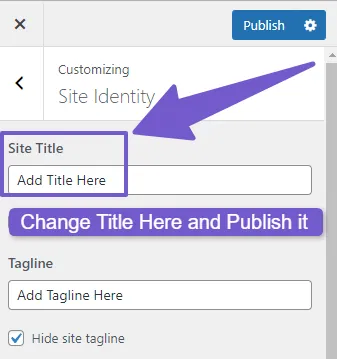
- Within the Customizer, find the “Site Identity” tab, click on it, and locate the “Site Title” and “Site Tagline” fields.


- Edit both fields as required and save your changes.
- Keep in mind that it may take some time for search engines to update and display your new site title.

The Customizer allows you to see real-time updates as you make changes, ensuring your title fits your vision.
Method 3: Using a Plugin to Change WordPress Site Title
Several SEO plugins make it easy to modify your site title. Here are three popular options:
- Using Rank Math: Install and activate the Rank Math plugin. After activation, you’ll see an option “Rank Math SEO” in the WordPress dashboard. Hover over this option and click on “Titles & Meta.” You can update your site title and tagline here.

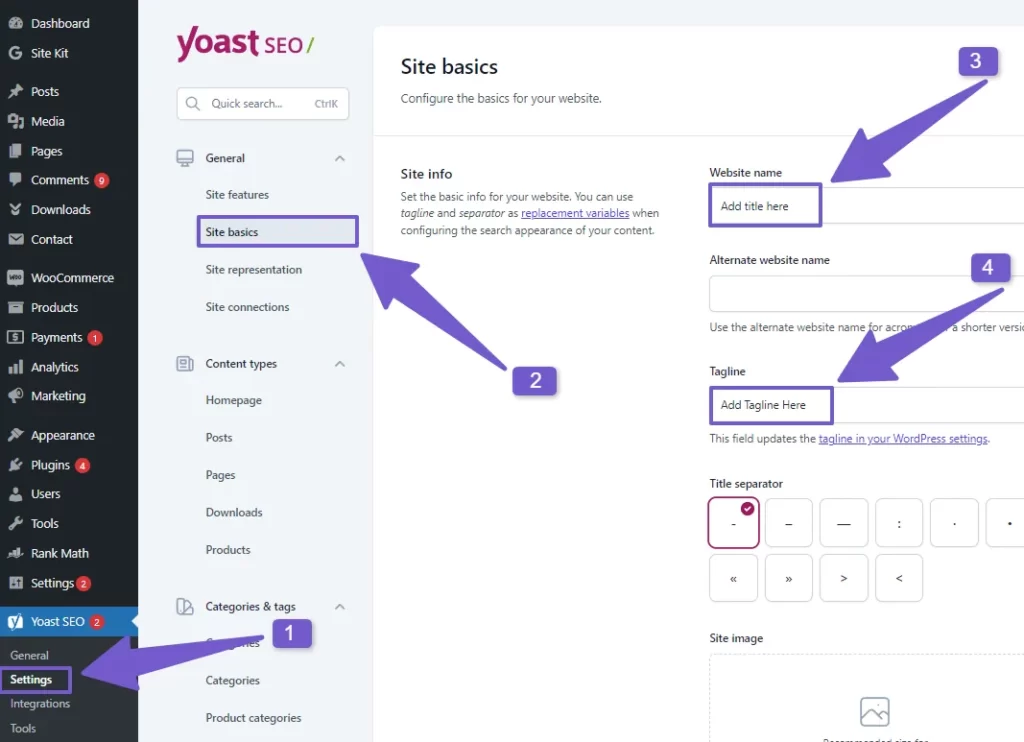
- Using Yoast SEO: If you prefer Yoast SEO, you can navigate to “Plugins” in your dashboard to install and activate the plugin. Then go to Yoast SEO in your WordPress dashboard. Click on it and go to General>>Site Basics to change the site title and tagline.

- Using All-in-One SEO: This plugin also offers site title customization through its settings. Activate it, and you’ll find the necessary options.
Method 4: Changing the Site Title with WordPress Page Builders
Many WordPress enthusiasts find the allure of page builders irresistible. The reason is simple: their user-friendly, drag-and-drop interfaces make the entire website creation process a breeze. If you happen to be one of those individuals who prefer working with a page builder, here’s some good news – they also offer a straightforward way to change your site title.
Although the process remains relatively consistent across different page builders, for this explanation, we’ll use one of the most popular and widely used page builders – Elementor.
Step 1: Open Your Page in Elementor
Begin by opening the specific page you want to edit in Elementor. Look for the “Edit with Elementor” button at the top of your page and click on it to enter the Elementor editing interface.
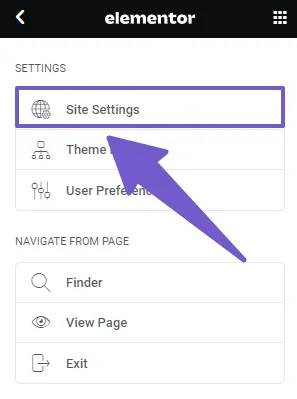
Step 2: Locate the Site Settings
Once inside Elementor, you’ll need to access the “Site Settings” or “Site Identity” section, which typically resides within the primary Elementor dashboard. You’ll likely recognize it by the presence of a hamburger icon. 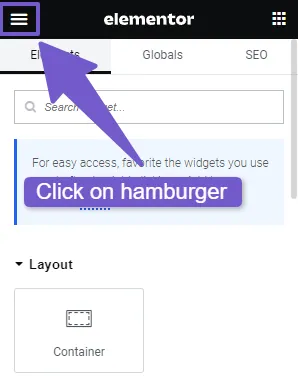
Step 3: Editing Your Site Title
Within the “Site Identity” section, you’ll find fields for both the site title and tagline. Focus on the site title field and proceed to edit it. Here is where you can input your updated site title to match your website’s new branding, content, or any other changes you wish to reflect. 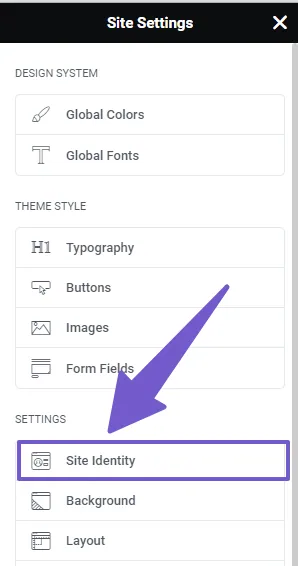

Step 4: Save Your Changes
After making the necessary alterations to your site title, don’t forget to save your changes. Typically, you’ll find a “Save” or “Update” button conveniently located at the top or bottom of the Elementor editor.
In this way, using page builders like Elementor can offer you a user-friendly and efficient method to modify your WordPress website’s title, ensuring it accurately represents your brand, content, or any recent adjustments you’ve made. These detailed steps will help you personalize your site with ease and create a lasting impression on your visitors.
Method 5: Changing Site Title With PHP Code
For more advanced users, you can directly modify your site title using PHP code. By accessing your theme’s files {How To Edit Functions Php File} and utilizing PHP, you can alter your site title. Here’s a simple example:
function changeSiteTitle() {
    return 'My Site Title';
}
add_filter('pre_option_blogname', 'changeSiteTitle');
Remember to back up your site and exercise caution when editing code.
Using PHP codes to customize your site provides more control. If you want to change your site tagline too then use the following code:
update_option('blogname', 'My New Site Title');
update_option('blogdescription', 'My New Tagline');
Considerations and Best Practices
When changing your site title, think about the impact on SEO and your site’s branding. Select a title that reflects your content, mission, and values. Ensure it’s memorable and unique to leave a lasting impression on visitors.
Conclusion
Your WordPress site’s title is a vital component of your online identity. With the six methods described in this article, you have the flexibility to customize your site title in a way that suits your needs and preferences. Whether you opt for the simplicity of WordPress settings, the real-time updates of the Customizer, the power of SEO plugins, the creative freedom of page builders, or the precision of PHP code, you can make your site title truly your own. Explore these methods and choose the one that aligns with your vision for your WordPress site.