
Having the right image size is crucial for an effective online store. It not only enhances the overall appearance of your products but also improves page loading speed. As a business owner, we understand that you desire freedom from complicated processes and unnecessary plugins. Are you tired of struggling with oversized product images on your WooCommerce website? Well, look no further! In this article, we will show you how to change product image size in WooCommerce, both with and without using plugins.
What’s the best image size for Woocommerce
So you’re wondering what the best image size for your WooCommerce store is, huh? Well, let me break it down for you. The ideal image size will depend on various factors such as your theme’s layout and the screen resolution of your customers’ devices.
| Aspect | Recommendation |
|---|---|
| Aspect Ratio | Use a square or landscape orientation with a 1:1 or 4:3 ratio for better compatibility across different devices. |
| Dimensions | A minimum width of 800 pixels is suggested for high-quality display on desktops and laptops. Upload larger images for automatic resizing without losing clarity. |
| File Formats | Use JPEG for product images as it offers a good balance between quality and file size. Avoid PNG unless transparency is needed or for specific requirements. |
| Compression | Optimize images to reduce file size without compromising quality. Use plugins to ensure fast loading times for your website. |
By following these guidelines, you’ll enhance the user experience and maintain visual appeal across all devices, making it easy for your customers to browse and buy with ease.
Resizing single product Page featured image in WordPress
the step-by-step process of resizing a single product page featured image in WordPress. To achieve this, you can follow the instructions below:
Step 1: Log in to your WordPress Dashboard.
- Go to your website’s URL and add “/wp-admin” at the end (e.g., www.yourwebsite.com/wp-admin).
- Enter your login credentials (username and password) to access the WordPress Dashboard.
Step 2: Navigate to the Products Section.
- In the WordPress Dashboard, find and click on “Products.” This will take you to the section where you can manage your products if you have an eCommerce plugin like WooCommerce installed.


Step 3: Edit the Desired Product.
- Locate the product for which you want to resize the featured image and hover your mouse over it.
- Click on the “Edit” or “Quick Edit” option that appears when you hover over the product. This will open the product editor.
Step 4: Access the Featured Image Section.
- Inside the product editor, look for the “Featured Image” section. In most cases, it’s located on the right-hand side of the editor.
Step 5: Edit the Featured Image.
- Click on the “Set product image” or “Set featured image” link/button to upload or select the image you want to use as the featured image for this specific product.
Step 6: Resize the Featured Image.
- After you have selected the featured image, WordPress may offer you the option to edit the image. If you have the “Edit Image” option available, click on it.
Step 7: Adjust the Image Size.
- In the image editor, you should see the current dimensions of the featured image.
- Change the dimensions to the desired size. You can set the dimensions in pixels or percentages.
- Make sure to maintain the aspect ratio to avoid distorting the image. If you only change one dimension, the other dimension will adjust automatically.

Step 8: Save the Changes.
- Once you have resized the featured image to your satisfaction, click on the “Save” or “Update” button to apply the changes to the product.
Step 9: Preview the Changes (optional).
- If you want to see how the resized featured image looks on the product page, you can preview the product by visiting its page on your website.
To resize the single product page featured image in WordPress, you can use PHP code. By changing the height and width values in the code, you can easily adjust the image dimensions to your desired specifications. This method offers a more personalized approach without the need for plugins or external tools.
Resizing single product Page featured image in WordPress Through PHP code
You can easily resize the featured image of a single product page in WordPress by using a simple PHP code that’ll make your product image look like it’s been magically transformed! Here’s how you can do it:
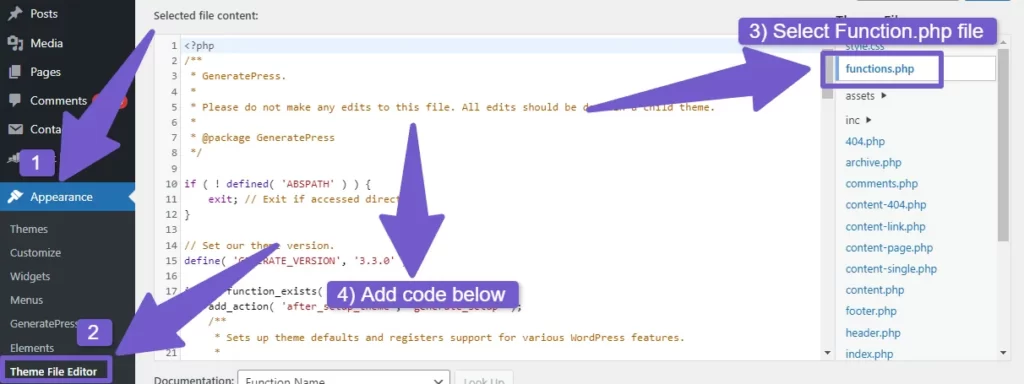
- First, open the functions.php file of your theme.
- Next, add the following code snippet to the file:
// // Override product image size on shop page
function custom_wc_shop_product_image_size($size) {
    $size['width'] = 800; // Customize the width as needed
    $size['height'] = 800; // Customize the height as needed
    $size['crop'] = 1;
    return $size;
}

add_filter('woocommerce_get_image_size_thumbnail', 'custom_wc_shop_product_image_size');
This code sets the width and height of the featured image to 800px and 600px respectively, with cropping enabled.
- Save the changes and refresh your single product page. The featured image will now be resized according to the dimensions specified in the code.
Using this PHP code gives you full control over resizing your product image without relying on external plugins. Enjoy your newfound freedom to customize!
Changing the height and width of a single product page featured image
Customize the dimensions of your single product page’s featured image effortlessly by adjusting the height and width with a simple PHP code snippet in WordPress.
To change the size of your featured image, you need to modify the functions.php file in your WordPress theme. First, access your website’s files through an FTP client or cPanel file manager. Locate the functions.php file in your current theme’s folder. Open it and add the following code snippet:
.woocommerce div.product div.images.woocommerce-product-gallery .flex-viewport {
height: 400px;
width: 400px;
}
Save the changes and refresh your website’s single product page to see the updated dimensions of your featured image.
Feel free to experiment with different values until you achieve the desired size for your product images. This method provides you with complete control over customizing the appearance of your single product page without relying on external plugins or complicated procedures.
Enjoy the freedom of effortlessly tailoring your WooCommerce store’s visuals!
How to resize shop page thumbnail image in WordPress
To resize the shop page thumbnail images in WordPress, you can follow these steps:
Step 1: Log in to your WordPress Dashboard.
- Go to your website’s URL and add “/wp-admin” at the end (e.g., www.yourwebsite.com/wp-admin).
- Enter your login credentials (username and password) to access the WordPress Dashboard.
Step 2: Navigate to WooCommerce Settings (if using WooCommerce).
- If you are using the WooCommerce plugin to manage your online shop, find and click on “WooCommerce” in the WordPress Dashboard’s left-hand menu.
- From the dropdown, click on “Settings.”
Step 3: Access the Product Image Settings.
- In the WooCommerce settings, click on the “Products” tab at the top of the page.
- Look for the “Product images” option in the horizontal sub-menu and click on it.
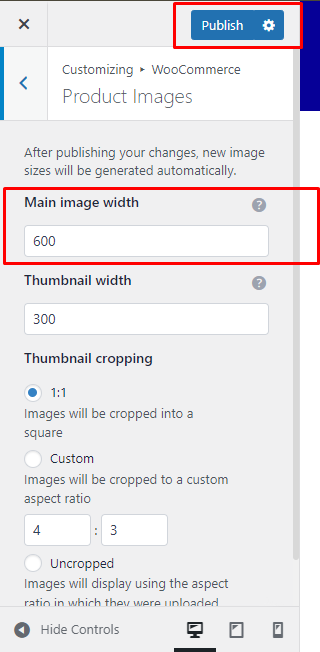
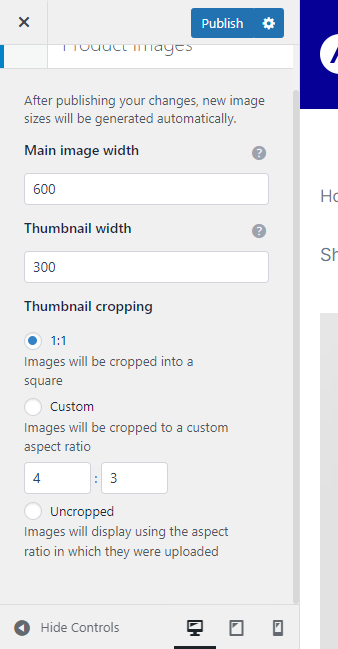
Step 4: Adjust the Thumbnail Dimensions.
- On the “Product images” settings page, you will see various options related to image sizes, including “Catalog Images,” “Single Product Image,” and “Product Thumbnails.”
- To resize the shop page thumbnail images, locate the “Product Thumbnails” section.

- You will find input fields for width and height dimensions in pixels. Change these dimensions according to your desired thumbnail size.
Step 5: Regenerate Thumbnails (optional).
- If you have already uploaded product images before changing the thumbnail dimensions, the existing thumbnails may not reflect the new size immediately. You might need to regenerate the thumbnails to apply the changes to existing products.
- There are various WordPress plugins available for regenerating thumbnails. You can search for “regenerate thumbnails” in the plugin repository and install one of them.
- After installing the plugin, go to the plugin’s settings page (usually under “Tools” or “Settings” in the WordPress Dashboard) and follow the instructions to regenerate the thumbnails.
Step 6: Save Changes.
- Once you have adjusted the thumbnail dimensions and regenerated thumbnails (if necessary), scroll down to the bottom of the “Product images” settings page.
- Click on the “Save changes” button to apply your settings.
Changing the number of products per column on the shop page
Adjusting the number of products displayed in each column on your shop page is a breeze! With WooCommerce, you have the freedom to customize and control how your products are showcased. Whether you want to increase or decrease the number of items per column, it can be easily achieved.
To begin,
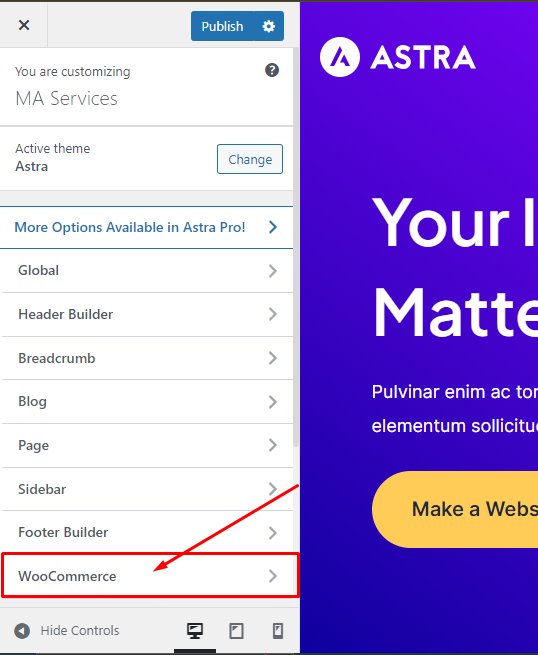
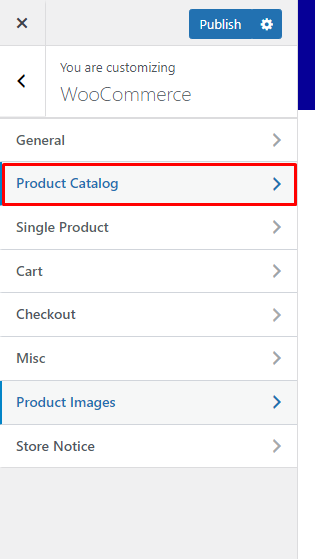
- Navigate to your WordPress dashboard and go to Appearance > Customize.
- From there, click on WooCommerce > Product Catalog.

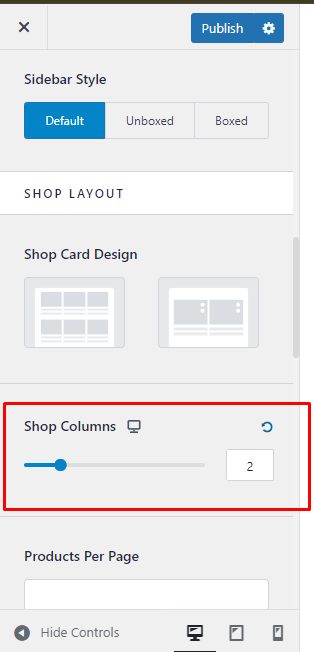
- Here, you’ll find an option called ‘Shop Columns.’

- By default, it’s set to 4 columns, but you can change it according to your preference. Simply select the desired number from the dropdown menu.
By adjusting the number of products per column on your shop page, you have greater flexibility in showcasing your merchandise exactly how you envision it. Enjoy the freedom to tailor your store’s appearance and enhance user experience effortlessly with WooCommerce!
How to resize product image size in wooCommerce using a plugin
Customize the dimensions of your product images effortlessly by utilizing a handy plugin in WooCommerce, allowing you to visually resize and optimize the visual representation of your merchandise. With this plugin, you have the freedom to easily adjust the size of your product images without any technical knowledge or coding skills.
To start, simply install and activate the plugin from the WordPress Plugin Directory. Once activated, navigate to the settings page of the plugin within your WooCommerce dashboard. Here, you’ll find a user-friendly interface that enables you to customize various aspects of your product images.
To resize product image sizes in WooCommerce, you can choose from various plugins available, one of which is the popular “Smart Image Resize for WooCommerce.”
Here’s a step-by-step guide to using this plugin:
- Access your WordPress Dashboard and navigate to the “Plugins” section, then click on “Add New.”
- In the search bar, look for the “Smart Image Resize for WooCommerce“ plugin.
- Install and activate the plugin by following the on-screen instructions.
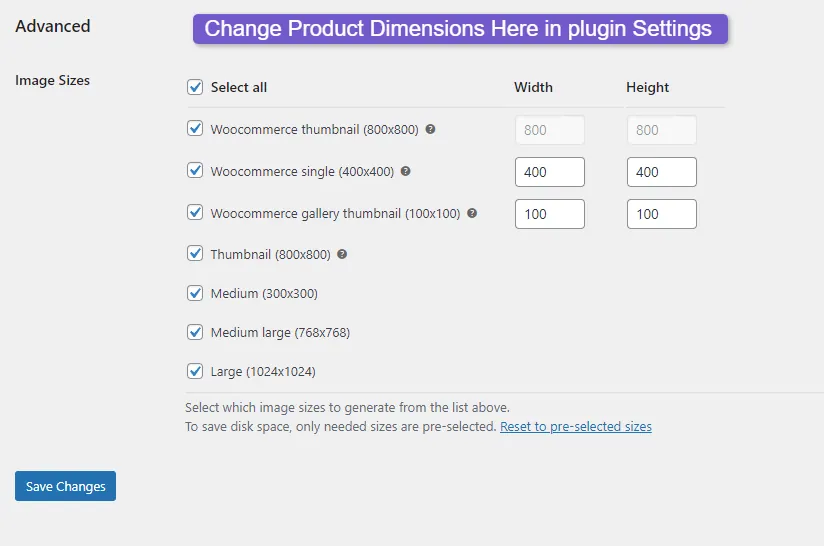
- After activation, go to the plugin settings, where you’ll find options to resize images for different sections, such as the single product page, shop page thumbnail, and product gallery images.
- Adjust the width and height dimensions for each of these sections according to your desired image sizes.

- Save the changes, and the plugin will automatically apply the new image sizes to the respective sections.
By following these steps, you can effectively resize product images using the “Smart Image Resize for WooCommerce” plugin, improving the appearance and performance of your online store.
Additional Reading:
How to Remove URLs from Google
How to Get Product ID in WooCommerce
With just a few clicks, you can ensure that each image showcases your merchandise in its best light while maintaining a consistent look throughout your online store. Enjoy the ultimate flexibility with this easy-to-use plugin for resizing product image sizes in WooCommerce!
FAQs (How To Change Product Image Size In Woocommerce)
What is the recommended image size for WooCommerce?
The recommended image size for WooCommerce depends on your theme and the layout of your online store. It’s best to consult your theme’s documentation or contact the theme developer for specific recommendations.
How can I resize the featured image on a single product page in WordPress?
To resize the featured image on a single product page in WordPress, you can modify the CSS code. Use the ‘max-width’ property to set the desired width and adjust the height accordingly to maintain aspect ratio.
What is the process to resize the thumbnail images on the shop page in WordPress?
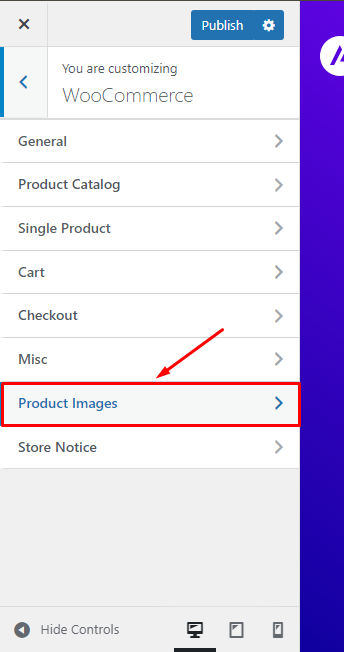
To resize thumbnail images on the shop page in WordPress, go to your WordPress dashboard and navigate to Appearance > Customize. From there, select WooCommerce > Product Images and adjust the dimensions under “Catalog Images.”
How can I change the number of products displayed per column on the shop page?
To change the number of products displayed per column on the shop page, you can modify the WooCommerce settings. Simply go to WooCommerce > Settings > Products > Display and adjust the “Products per row” option to your desired number.
Is it possible to resize the product image size in WooCommerce using a plugin?
Yes, using plugins, it is possible to resize the product image size in WooCommerce. There are several plugins available that allow you to easily customize the image dimensions according to your preferences and requirements.
Conclusion
In conclusion, changing the product image size in WooCommerce is a crucial step to enhance your online store’s overall appearance and performance. Whether you choose to resize the images manually or use plugins, it’s crucial to find the optimal image size for your specific needs.
Did you know that, according to a recent study, websites with properly optimized images have seen an increase in conversion rates by up to 40%? So don’t overlook this aspect and make sure to resize your product images effectively for better results.